Delivering Mail Services to Multiple Domains in Exchange Server
Murat Yildirimoglu
MCSE, MCT
murat@muratyildirimoglu.com
Mark Minasi wrote an excellent article in September 2001 issue of the Windows 2000 Magazine, about running multiple sites on a single server. In this article I complement his with information about delivering mail services to multiple domains. I think it is easier to serve multiple domains on a single Exchange Server. At the end of the article, together with the IIS article, you can host multiple www and e-mail domains on a single computer and even start your own ISP business.
When Exchange Server is set up, it serves only a single domain. In Exchange Server 5.5 This domain is determined when you initially set up Exchange Server 5.5. In Exchange 2000 Server, it is determined according to the domain name of the Active Directory in which the Exchange 2000 Server was installed. You must do extra things to make your Exchange Server serve multiple domains.
Delivering mail services to multiple domains consists of some simple steps: First, you must create mailboxes with suitable e-mail addresses belonging to different domains. Second, you must tell your Exchange Server that it will be responsible for the mail messages coming to new domains. Third, you must set up your DNS server so that your computer has an Mail Exchanger (MX) account for the new domains.
Let’s start with Exchange 5.5. In Exchange 5.5 you can create mailboxes from two places: User Manager for Domains and Exchange Administrator. You can create different containers for the new domains and create the new mailboxes under corresponding containers. After creating mailboxes, you must change the e-mail addresses of the newly created mailboxes. There is no automatic way, or a recipient policy as in Exchange 2000, to determine the e-mail addresses suitably. Then, switch to the Connections container and locate the Internet Mail Service there. Double click Internet Mail Service and switch to the Routing tab. At this tab, you must specify that the new domain must be regarded as “inbound”. That is, if messages targeting this domain are received, they are processed by the Exchange Server, rather than trying to relay the messages to their destinations.
In Exchange 2000 Server, we have more flexibility. We have organizational units in Active Directory (AD) which can accommodate users and their mailboxes from different domains. These organizational units can be used to determine the e-mail addresses for the users in them, thanks to Recipient Policies, new to the Exchange 2000 Server. Recipient policies determine e-mail addresses automatically, according to the users’ and their mailboxes’ locations, or users’ groups etc. For, example, you can create a recipient policy for the users whose mailboxes reside in a specific mailbox store, or whose user accounts reside in a specific organizational unit (OU). I will use mailbox store because I want to store the mailboxes belonging to the other firms in a different store. Nevertheless, it is a good idea to combine the user accounts in their own organizational units.
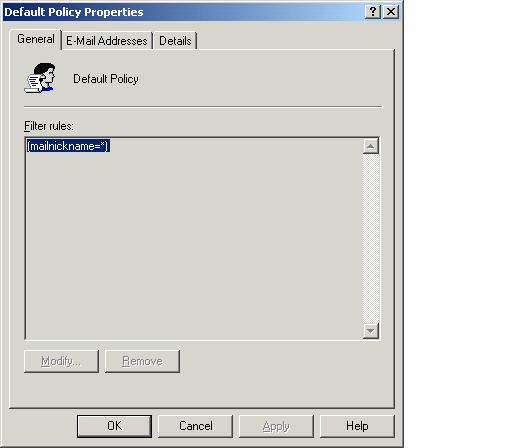
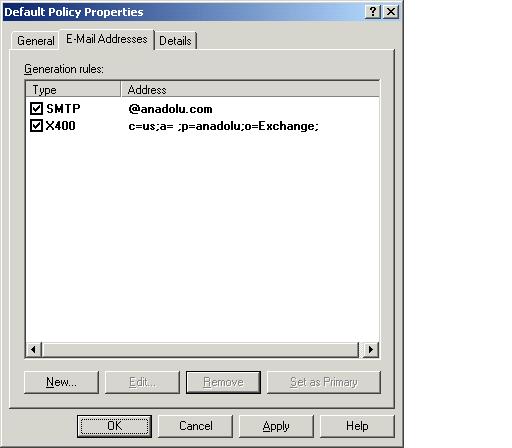
First, create new organizational units for different domains we want to serve in AD domain, using Active Directory Users and Computers console. Second, you must create a recipient policy relating to the mailbox store you created for the new domain. Open Exchange System Manager, and switch to the Recipients container, then to Recipient Policies container. You will see a default policy there which states that for all newly created mailboxes, specify the e-mail address in accordance with the AD domain name. For example, if the domain name is anadolu.com, then the default recipient policy says that e-mail addresses will be created adding domain name to the end of the mailbox alias name (Figure 1 and Figure 2).
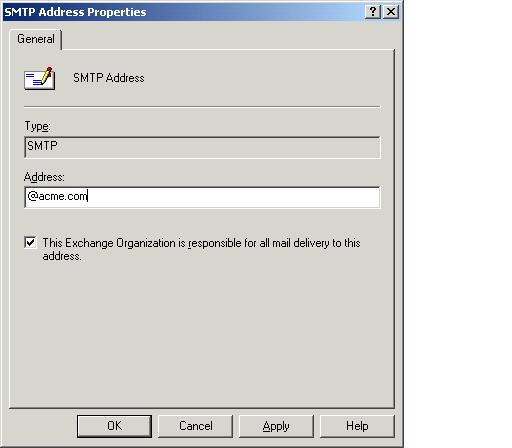
We can create a new policy easily. Right click Recipient Policies and select the New, Recipient Policy option. In the General tab of the Properties dialog box, you must specify a name for the policy and Filter rules (criteria for the policy). To specify the filter rules click Modify button. In the resulting Find Exchange Recipients dialog box you can define many criteria. Because we just want to specify a rule for the mailbox store, choose Storage tab. In the Storage tab, choose Mailboxes in this mailbox store option. Using the Browse button you can choose the store easily (Figure 3). (I chose a store named acme.com store which I created and mounted before.) When you click OK you will receive a warning message (Figure 4). When you close this warning message clicking OK you will see the filter rule prepared for you based on your choice (Figure 5). After completing the filter rules, switch to the e-mail addresses tab of the dialog box, and edit the SMTP address there accordingly (Figure 6). When you edit the e-mail address, make sure that “This Exchange Organization is responsible for all mail delivery to this address” checkbox is selected. This checkbox is equivalent to the Routing tab of the Exchange 5.5 Server Internet Mail Service. When you click OK to close the dialog box, you get a message asking if you want to update SMTP addresses according to this new policy. Click Yes. New policy is placed to top, above the default policy, so, the first policy processed is this policy.
After creating such a policy, new users with mailboxes placed in that store (Figure 7) will have e-mail addresses accordingly.
The last thing to do, as in the IIS case, is setting up the DNS server, so that, our computer will be the mail server for the new domain. Switch to the DNS console, locate the acme.com forward-lookup zone, right click and choose New Mail Exchanger option. Enter the fully qualified domain name (FQDN) of the mail server in the Mail server text box. That’s all. From now on, your mail server serves the new domain also, accepting messages destined to acme.com and delivering these messages to associated mailboxes.